Wednesday 26 December 2012

Guess Who's Hosting This Weeks Challenge Over At Stampotique????

Yup it's lil ol me! Before we get down to business I hope you all had a very Merry Christmas with plenty of new goodies to play with?? If you did then hopefully you'll come and join in with this weeks Stampotique challenge which is "Out with the old and in with the new". 

Which basically means that if you were very good then Santa will have bought you lots of new stash to play with, which means you can either make a project using a combination of old and new stash (just don't forget to tell us what it is). Or if you weren't so lucky, you can make something to celebrate the new year. The choice is yours!

I went for a combination of both for my card!


I used die cut numbers to create a mask before spraying the card with a combination of inks. Whilst I waited for the ink to dry, I stamped up Head and "Gussie Up" which were then cut to size and coloured as necessary. Once the background was dry, I matted and layered it onto cardstock and added some Glossy Accents to the 2013 to add dimension. 

I do hope that you'll join us as I can't wait to see what you come up with.

So all that's left for me to do is to wish each and everyone of you a very Happy, Healthy and Prosperous New Year.

Claire xxx

Monday 24 December 2012

Keep Calm & Carry On - It's Only Christmas!!!!

Hee hee so are you all feeling the pressure?? I sure am!!! I currently have builders in the house and it is has hugely disrupted my Christmas preparations (and crafting). I really wanted to be organised this year and send out cards to some of the lovely people that I have met through blogging, the organised bit never materialised but I did manage some very last minute cards and this is one of them! This is ideal for making in batches and the best bit is you don't need to be really precise with anything - so no faffing around measuring and matching colours!


To start I knocked up a few Gesso background pieces which I immediately sprinkled with Glamour Dust. Whilst they were drying I stamped, coloured and cut out my images. I added some interest to the background with embossing powder, cut the sentiment ribbon into individual words and then quickly assembled my cards. To finish I added Glossy Accents to the lights and baubles.

What do you think?? Not bad for a rush job??

I'm going to enter this card into the Moneysupermarket.com Christmas card contest. Keep ya fingers crossed for me as there are some awesome prizes up for grabs!!!

Right, I'd better get off of here and carry on with my Christmas preparations! You won't be seeing very much of me until about February, so I'd like to wish each and everyone of my readers a Very Merry Christmas and a Happy New Year.

Thanks for stopping by today.

Claire x

PS Oh and whilst I'm here, don't forget to enter the Crafty Ribbons Advent Event, there are loads of prizes to be won and the DT have worked really hard to bring you lots of inspiration. Remember even if you missed day one, you can still enter as Mr Linky will remain open until 26/12.

Materials:
Images: Tangled Enthusiasm, Abstract Foliage
Sentiment Ribbon - Crafty Ribbons
Gesso, Embossing Powder, Stickles

I'd like to enter this card into the following challenges:

Tuesday 18 December 2012

Cat's Choir! Christmas Box

Good morning. It's my turn post over at the Stampotique Designers Blog, so I've decided to double up this post with the Crafty Ribbons Advent post.  I've been desperate to show you this wall hanging, but have been unable to do so until I knew that it been safely received! It was a complete devil to photograph, so please excuse the picture quality.


It started life as a simple kraft box frame from  The Range. I covered it with a thick layer of Gesso and dabbed at it with a palette knife to give it loads of texture. Whilst it dried I stamped out, cut and coloured Oh Tree, Small Tree Topper, Front Door Shrubbery, Christmas Ornaments Cube, Mini Christmas Ornaments CubeWelcome Door, Line Up and Snowman. I then drew a little carol book and die cut a Lampost using my new Sizzix Die and coloured them with Promarkers.


Once the Gesso had dried, I layered up some torn,inked strips of paper and dabbed some textured modelling paste over them. As the frame still looked a little bare I added some silver heat embossing using Abstract Foliage. Once the base was completed, I created the scene.


To finish I chucked on a bit of glitter and some Glossy Accents. I then added the fantastic Merry Christmas ribbon from Crafty Ribbons, and some Pinflair icicles which were covered with Glamour Dust.

Thanks for stopping by today.

Claire x

I'd like to enter this project into the following challenges:

Saturday 15 December 2012

Gothic Arch Wedding Card

Well did you see the launch of the new Polka Doodles Cherry Blossom CD on Create & Craft? Weren't the DT samples lush? If you bought the cd, leave me a comment when you've made something with it, so that I can pop across and take a look!

If you didn't see the show then you will have missed this little card that I created. As you are all aware the turnaround time on samples is very tight and I cut everything by hand, so if there's a mistake I have very little time to rectify things. This card didn't quite turn out as I expected and after I'd finished it I had another idea for it, but just haven't had time to execute it! I think it will be a project for later in year!

Anyway, this is my card (apologies for the large number of pictures, but I wanted to show you the detail on it). I've used the gorgeous leaf ribbon from Crafty Ribbons to embellish the front of the card and the fantastic Cherry Blossom CD for the rest of it. The Gothic Arch was a chipboard shape from Tando which I simply resized as I needed.

Front of the card
Inside
Inside
This one shows of all of the sparkle and shine

So what do you think?

Thanks for stopping by today.

Claire

I'd like to enter this bag into the following challenges:

Thursday 13 December 2012

Polka Doodles Has A New Release!!!

Morning. Sorry nothing crafty from me today - I'm up to my eyeballs in things here! Just thought I'd let you know that Polka Doodles will be launching a new CD on Create & Craft on the 14th December. Shows are scheduled to go out at 10am and again at 4pm. I've made a couple of samples with the new collection, so I hope that you'll find the time to tune in. I can promise you that the new collection is gorgeous!

I'll be back later in the week with some crafty makes.

Thanks for stopping by today.

Claire x

Wednesday 12 December 2012

Cute or what???

Good morning it's time for another challenge over at Stampotique and this week we want to see you make a Christmas card but not using a Christmas stamp!!! Remember you don't need to use Stampotique stamps to enter, but obviously we'd love it if you did!


For my card I've used the uber cute Hung Out To Dry which has been stamped, cut out and placed in a little hand drawn stocking. The image has been coloured with Promarkers. I've added some lace for texture and a sentiment using ribbon.

Whilst I'm here I just want to remind you that Crafty Ribbons is staging it's Christmas Advent Event and there are loads of prizes up for grabs, so don't forget to hop on over.

Thanks for stopping by today

Claire x

I'd like to enter this card into the following challenges:
Make It Monday - Anything goes
Inspire Me Friday - Anything goes

Wednesday 5 December 2012

Have Faith!!! It's a Gesso ATC

Morning. Surprised to see me I bet? Well I thought that I'd show you this ATC that I made for the Wicked Wednesday ATC Challenge Blog who are being sponsored this week by Stampotique. The theme is "Wing It" which basically means anything with wings, so should be a nice easy challenge for most of you.

I have to say I really don't know why I don't make more ATC's as I had lots of fun with this one and they are great for trying new techniques and using up scraps of card. Maybe one of my New Years resolutions will be to make an ATC a week and participate in few swaps?


Anyway, onto my ATC. I used a Gesso technique that I'd spotted in Craft Stamper magazine to create the textured background. I liberally sprinkled the wet Gesso with angel dust aka as glitter and left it to dry. Whilst I waited for the Gesso to dry, I stamped Daniel's Tree Topper Large onto lightweight card three times, coloured with Promarkers and then cut her out.


Once the Gesso was completely dry,  the raised parts were swiped with silver acrylic paint and the edges stamped and heat embossed using Abstract Foliage.  The angel was then decoupaged onto the ATC. I printed the sentiment from JM Barrie onto tissue paper and then cut it out and used Mod Podge to place it onto the ATC. At this point I decided that the ATC needed something more, so I stamped Daisy Daisy onto some tissue paper, coloured with Promarkers and Mod Podge'd (is that a word??) it into place.

I do hope that you'll join the challenge.

Thanks for stopping by.

Claire x

Saturday 1 December 2012

Woooo Hoooo!!!! 24 Days To Go!!! Advent Countdown Chalkboard

Good Morning. Can you believe that it's the first day of advent??? No me neither - you just know that one blink and it's going to be Christmas Eve! :D Today sees the start of Crafty Ribbons Christmas Event which can only mean one thing...... lots of lovely inspiration and prizes each and every day! To enter simply pop across and enter your name in Mr Linky.

So to help keep us all on track I've designed this Christmas Themed Chalkboard. I've decided to use mine as a countdown calendar, until the big day when it will become a "Mum's Kitchen's Closed" sign!


I found the chalkboard in the poundstore and have used elements from Studio 12 Picknix Collection 2 - Gingerbread Twist to decorate it (and yes everything was handcut - sigh Santie I've been a real good girl won't you please deliver me a Cameo Silhouette???). The gorgeous gold edged organza ribbon is of course from Crafty Ribbons. To finish I've added Rock Candy Stickles, Star Dust Stickles and of course Glossy Accents.

Thanks for stopping by today

Claire x

I'd like to enter this project into the following challenges:

Thursday 29 November 2012

Crafty Ribbons Advent Event


Hello Everyone,
Time to share some news with you all..... Over on the Crafty Ribbons Inspiration blog we are having another  one of our fabulous events this time we are doing a Christmas Advent event which will run from 1st December through to the 24th December........

Each day we will be highlighting a different Craft Company or Shop,the Design Team will be posting cards/projects on  the Inspiration blog and on their blogs each day there will also be a prize from the highlighted Company up for grabs that's 24 prizes  in total and you can enter each day,only one entry per person per day to make it fair,so make sure to become a follower and remember the Christmas Advent will start at 8.30am (GMT) on the 1st December the Design Team hope you will all join in the fun and countdown to Christmas with us....... 


To kick off our new event we are offering some fabulous ribbon candy......


vintage Christmas ribbon

CONTENTS MAY VARY

 If you would like to win these gorgeous ribbons..then all you need to do is go over to the Crafty Ribbons Inspiration Blog and checkout the post about our Christmas Advent event...

I'll be back on Saturday with a little something for advent!!!!!

Thanks for stopping by.
Claire x

Wednesday 28 November 2012

It's a wrap! Stampotique Challenge

OK just in case you haven't guessed what this weeks challenge is over at Stampotique, I'll tell ya!! It is of course gift wrapping. Take a peek at what the other girls have done, there are some amazing ideas! As always you can use any stamp to play, just ensure that it fits the challenge theme.

I seem to have an abundance of small gifts to give this year, so thought that I'd take this as an opportunity to make another of the A4 gift bags that I showed you the other day.


I started off by spritzing a sheet of paper with Cosmic Shimmer Mist, I then unscrewed the cap and dripped some over the paper randomly. Once it had dried I layed some snowflake shapes over the paper and spritzed again and left it to dry again. I then made the bag up and decorated it with Snowman (coloured with Prismacolor pencils) and some snowflakes. To finish I added some glitter, Glossy Accents, Dewdrops and Seam Binding Ribbon.

Thanks for stopping by today.

Claire x

I'd like to enter this project into the following challenges:
Make It Monday - Anything goes
Inspire me Friday - Anything goes


Sunday 25 November 2012

Stampotique Christmas Fairy

Just a quick post from me today to show this little Christmas Fairy wall hanging that I've done for this weeks challenge over at Stampotique which is to use paint on your creation.

It's not turned out quite as I expected but I think I still like it.....let me know what you think.


I really hope that you'll be joining us for this challenge. Remember you can use any stamps and  we've made a change to the submission rules "You will now have until the first challenge of the following month to submit your entries-we will only have one Inlinkz per month"  which means that you now have even longer to take the opportunity to play along with us.

Thanks for stopping by today.

Claire x

Materials:
Stella
Big Bee
Promarkers
Prismacolor pencils
Modelling Paste
Canvas Board
Ribbon
Acrylic paints
Stickles
Circle and snowflake punch
Glossy Accents
Sizzix/Tim Holtz Birdcage Die
Sizzix Holly Die
Antique Gold Embossing Powder
Wooden snowflakes
Flowers
Dewdrop Gems

I'd like to enter this project into the following challenges:
Crafty Creations - Christmas is coming
Make It Monday - Anything goes
Inspire Me Friday - Anything goes

Friday 23 November 2012

Exciting News & An A4 Paper Gift Bag Tutorial

Well some of you may already know my news, but for those of you who don't...... I've been asked to join the Crafty Ribbons DT as a project maker!!! :D  Sorry for not telling you all sooner, but I don't like to post unless I have something to show you and I've been mega busy lately with various projects and some much needed building work which has left little time for crafting :(

I'm being a bit cheeky with this weeks post as I'm using my project for not one, not two but three DT samples (see I told you time was tight!!). So if you're ready.....deep breath and ...... the challenge this week over at 
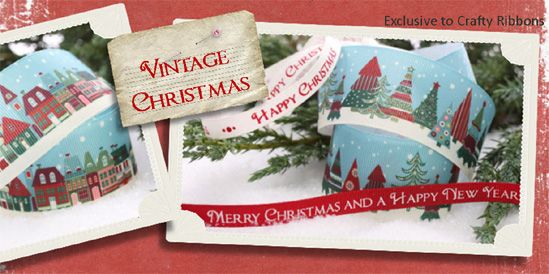
Crafty Ribbons is to use two ribbons we have a fabulous prize of          . The Polka Doodles Challenge is to use a die and the prize is a copy of Nikky Hall's fabulous Colour Therapy DVD . Finally it's also my turn to post over on the Studio 12 inspiration blog (I hope you've all remembered to enter this months giveaway, cos there's a fabby prize on offer!!!).

Anyway, after much thought, I decided that I'd make one of my little gift bags using a sheet of A4 paper! Which means that I've also killed four birds with one stone and finally got round to doing one of the long awaited tutorials that I promised  awhile back! Yay go me!!!

So here's the bag and below is a tutorial which I'm kinda hoping makes sense!!! If it doesn't give us a nudge (and be sure to leave a contact email) and I'll try to explain things a bit more clearly.


Now, you'll have to forgive the picture quality for the tutorial, but these photos were taken at night and with my old camera.

1. Take a piece of A4 decorative paper (I've printed mine from the Studio 12 Picknix Collection 2 - Gingerbread Twist) and score a line down the long edge at 1 1/2"


2. Then take an edging punch and with the white side facing punch a patterned edge.


3. Then fold along the score line.

4. Next take a mini cereal box and wrap the paper around it so that the outer edge meets the edge of the box exactly, lightly crease the corners to give you guide for scoring.


5. Score the creases you have marked (mine were at 3", 4 10/16", 7 1/2 and 9 2/16"). Wrap around the box to ensure that you get a neat edge. If there is a slight overhang simply trim to size.


6. Next trim the inside flap down so that it is about 1/2"


7. If you're going to ink the edges, now is the time to do it.


8. Wrap the paper around the box and glue the edge into place as shown. I tend to get the top edge as perfect as I can, hold in place with a clip and then slide the box down through the paper so that I can apply pressure to the glue and keep a perfect edge. Leave to dry thoroughly.


9. Once dry, slide the box towards the base of the bag leaving approximately 1/2" then fold as shown (it's the same as if you were wrapping a parcel).


10. Glue and leave to dry.


11. Remove the box and then pinch the top edges of the bag together to fold the side seams in half.


12. Fold the bag completely flat as shown and punch holes for handles or a threaded tie top. Decorate as you please.


Thanks for stopping by today.

Claire x

Materials:
Blue Happy Christmas Ribbon - Crafty Ribbons
White Loopy Ribbon - Crafty Ribbons
Studio 12 Picknix Collection 2 - Gingerbread Twist - Polkadoodles
 Marianne Creatables LR0125 die

I'd like to enter this project into the following challenges:
Make It Monday - Anything goes
Bunny Zoe's - Winter
Crafty Bloggers Network - Christmas Anything goes
Fashionista Challenge - Blue Christmas
Hooked On Craft - Christmas No Red/Green
Little Claire's - Christmas

Wednesday 14 November 2012

UTEE Bee Necklace

Wow where is time going? I can't believe that it's time for another challenge over at Stampotique! This week we want to see Nature themed projects. Remember to play along with us you don't need to use Stampotique stamps (although we'd obviously love it if you did) and you now have until the first challenge of the following month to submit your entries, so plenty of time to get those gorgeous creations in!

For those of you who regularly follow my blog, you will possibly remember me showing you my Steampunk Bee which my daughter was rather taken with before I "steam-punked" it and turned it into a wall hanging. Well I finally got round to making her a UTEE Bee which she then wanted made into necklace, so here it is....


I stamped Big Bee onto card five times, cut him out,coloured and layered him up with Pinflair Glue. Then I punched holes into the wings and swiftly dunked him into a molten UTEE/UTEE Flex bath. The wings were then given a coat of Star Dust Stickles before adding the jump rings and double length of chain.

However, you know what kids are like they are never satisfied and she now wants a ring and bracelet to match, so guess who's had to buy Small & Medium Bee?? So you know that shortly I'll be showing you those!! 

Thanks for stopping by today.

Claire x

I'd like to enter this necklace into the following challenges:
Make It Monday - Anything goes
Inspire Me Fridays - Anything goes

Friday 9 November 2012

Vintage Keepsake Bauble Book Card

This is the last of my TV samples that I made for the launch of the Studio 12 Picknix Collection 2 - Gingerbread Twist CD. If you've been watching the shows you will doubtless have seen it! Just incase you missed it or fancy a closer peek, here it is in all it's glory!

I warn you now this post is going to be picture heavy, so apologies if the page is slow loading.


I wanted to make something using the traditional gingerbread man and after much umming and arrrghinhg and stash sorting I settled upon making a book card with a detachable bauble.


I've had some papier mache baubles in my stash for what seems like forvever. I'm really not sure why I haven't used them before as I really enjoyed altering the bauble and what's more it actually looks pretty good too!


The book card has been made to fit the bauble and so that it could hang and be removed I've simply made a hole in the top of one of the "pages" and pulled the thread through. It has been secured at the back using cinnamon scented melted wax.


The card uses papers from the cd which have been distressed, painted upon, ripped and faux stitched to within an inch of their lives! I've used a mixture of pre-coloured collage images and digital stamps coloured with Promarkers to create the focal points on the card.


If you look closely at the ribbon tie on the side of the card, you will see that it picks up the paper ribbon on the front of the card.... yep, homemade ribbon using one of the images from the CD. I'm sooo excited that this worked as it now means that I can get coordinating ribbons for all my projects :D


I do hope that you like my project and that I haven't bored you to tears with this long post.

Thanks for stopping by today

Claire x

I'd like to enter this project into the following challenges:
Paper Crafting Journey - Anything goes
Simply Create - Anything goes
Crafts & Me - Reds
Just keep On Creating - Christmas
Whimsy Inspiration - Christmas
Papertake Weekly - Anything goes
Through The Craftroom Door - Anything goes
Make It Monday - Anything goes

Wednesday 31 October 2012

More Poop!

Happy Halloween!!!

It's time for another challenge over at Stampotique and this time we want to see your Funny Halloween creations! Now I have to say I struggled with this challenge - a) cos I'm not very funny and b) twice I went to make something and saw that someone on the DT had used the stamp in a similar way! So I'm afraid to say that I've gone for baseline humour and produced Bat Poop!


I used my new Sizzix Box Die (656245) to make the box which was then covered with Distress Ink and Pearl Glimmer Mist before over stamping with Abstract Foliage. The sentiment has been computer generated, printed onto acetate and then highlighted with white gel pen. The image Batty was stamped onto scrap card, cut out and given a coat of Glossy Accents before being mounted onto the assembled box. To finish I added some choccie raisins. I've made a small stash of these to hand out to any Trick or Treaters that may come calling tonight.

I really hope that you'll be joining us for this challenge. Remember you can use any stamps and  we've made a change to the submission rules "You will now have until the first challenge of the following month to submit your entries-we will only have one Inlinkz per month (at top of blog); so today marks the start of the challenges for October and it will run through the close of our last challenge for October on November 6, 2012 at noon ET" which means that you now have even longer to take the opportunity to play along with us.

If you're celebrating tonight have a fantastic time. I'm taking my son out Trick or Treating we then have a few friends over for a bite to eat and few drinks! Thanks for stopping by today.

Claire x

I'd like to enter this project into the following challenges:
Make It Monday - Anything goes
Inspire me Fridays - Anything goes
Tando Creative - Purple, Orange, Green & Black

Sunday 28 October 2012

Another Glass Cube!!

Good morning. It's time for another giveaway over at Studio 12 and as always the entire DT have created a little something for your inspiration. My offering is another of these little glass cubes which I first showed you on Wednesday. Once again I'm going to have to apologise for the picture quality, but these are a devil to photograph! I actually tried to get a picture placed next to a 50p piece to give you an idea of scale, but failed miserably!


This time I've used Studio 12 Picknix Collection 2 - Gingerbread Twist and inkjet printable shrink plastic. Instead of being a standing decoration, I've made this one into a hanging one - I thought as the kids were older and I no longer have a kitty that this might look kinda cool on the Christmas Tree! :D Anyway, I don't think this is the last you've seen of these - I've a few ideas swimming around for them!


Thanks for stopping by today.

Claire x

I'd like to enter this project into the following challenges:
Inspire Me Friday - Anything Goes
Make It Monday - Anything Goes
Crafty Ribbons - Christmas
Crafty Ann's Challenge - Christmas in October
Fussy & Fancy Friday - Anything goes
Through The Craft Room Door - Anything goes
Crafty Bloggers Network - Anything goes

Friday 26 October 2012

C&S Snowflake Card

This is another of my C&S makes that I did for the launch of the Studio 12 Picknix Collection 2 - Gingerbread Twist.


I wanted this card to have a really delicate look about it, so I printed the patterned paper from the CD onto some masking tape and laid it across the card. I then faffed around with trying to place a sentiment somewhere and decided that it needed to be where the tape was. At this point I considered running the tape back through the printer, but just knew that I struggle to get it placed correctly or worse still that the ink would smudge. So I decided that I'd try printing onto tissue paper and gluing that in place. Bingo! It worked!

The snowflake is cut from patterned paper using my trusty Marianne Creatables LR0125 die. I've then covered it in Diamond Dust, attached one of the little snowflakes from the paper and topped it off with a gemstone.

Thanks for stopping by today.

Claire x

I'd like to enter this card into the following challenges:

Wednesday 24 October 2012

Copy Cat? Or Inspired By?

Morning. It's time for another challenge over at Stampotique and this time we want to see you CASE a member of the DT's work. Now this is a challenge that I'm not altogether comfortable with as whilst I think it's OK to take inspiration from another person I don't think it's OK to copy their work in it's entirety especially when no credit is given to original artist. In addition when someone has created something brilliant, that little voice of self doubt creeps in and tells me that I'll never make anything as good/beautiful and as a result kills my mojo. Anyhow, as the challenge had been set I thought I'd play along, so I had a good look round my fellow team mates blogs and selected my victim!!!

I decided that I CASE my uber talented teamy Samantha Read and make one her fantastic glass cubes. I knew that it was going to be a challenge to make one of these that looked half presentable, but man I didn't think I'd fall at the first hurdle!! Oh and you'll have to excuse the picture quality on this post as well, it was an absolute nightmare to photograph!


Firstly, my Memory Glass was only 1 1/2" but I decided I could live with that, but then I spotted that Sam had used Super Glue :O - help........!!!! I'm such a messy worker that the words Super Glue struck terror into my heart. I've only used the stuff once and it almost ended in a trip to A&E with the kitchen worktop in tow!!! So with that in mind I was all but ready to go and CASE someone else! However, you know me I won't be defeated, so I slept on it and thought I'd try a couple of other things in place of the Super Glue.

I started off by trying UTEE which was OK but didn't allow me enough time line up the glass fully. Then I moved onto Memory Tape - this was reasonably successful but just looked a little cumbersome and kind of swamped my cube. So my last resort was Pinflair Glue - omg I love this stuff! It worked a treat!


I then stamped Snowman, Oh...Tree and Picket Fence onto white shrink plastic, coloured with pencils and then once shrunk glued them into position. I added some "faux snow" that I got in the Pound Store and then sealed my cube.

Sam used molten embossing powder to create the "faux soldered" effect on her cube and mentioned that her's had fallen to pieces a couple of times whilst dipping - eeekkk - molten UTEE burns just do not do it for me!!! I contemplated leaving the glass joints as they were, but then noticed that I had a tiny gap in the top right corner. So, I thought I'd try my usual swipe with Versamark and embossing powder technique. So glad I did as it worked just fine and I felt like I had a little more control over where the embossing powder went. Also, where odd specks of the powder stuck to the glass it gave a frosty effect (this can be scraped off if you don't like that effect).


To finish I added a shrink plastic snowflake and some glass pearls. I then looked at it and thought that it needed something else, so I added some Pinflair Glue Icicles (idea for these nicked from here). I've tried to show you how gorgeous they look in the above picture, but seem to have failed miserably :(

So what do you think of my spin on Sam's cube, is it a copy cat one or simply inspired by her?

Thanks for stopping by today.

Claire x

I'd like to enter this project into the following challenges:
Through The Craft Room Door - Anything goes
Make It Monday - Anything goes
Stamptacular Sunday - No rules
Inspire Me Friday - Anything goes
Anything but a card - Anything but a card

Friday 19 October 2012

Halloween Hanger

Good morning :D

It's time for another challenge over at Polka Doodles and this week we want to see your Autumn creations, so think leaves and swirls with lots of brown, red and orange! This is my contribution this week, I hope you like it!


I printed out the images from the A Sundae of Seasons CD and coloured everything with Distress Inks. The background was created with more Distress Inks, flicked it with water and then spritzed with Glimmer Mist (which sadly doesn't show in my photo, so you'll have to try and imagine the subtle shimmer). The images were mounted onto the background using Pinflair Glue. To finish I added some Stardust Stickles to the pumpkin and curled some wire to create the hanger.

I do hope that you'll join us this week. Remember you don't need to use a Polka Doodles image to enter, just make sure that project fits the theme.

I hope you all have a fabulous weekend. I shall be clearing my loft in preparation for the builders!

Thanks for stopping by.

Claire x

I'd like to enter this card into the following challenges:
Make It Monday - Anything goes

Sunday 14 October 2012

Look what I did!!!

See this is what I do to keep myself out of mischief at the weekends! Last weekend I was lucky enough to attend an Andy Skinner workshop with the seriously bonkers Siobhan Brignull (aka Essex Gal) and this is what we made.


I know it's not my usual thing, but I really do like it. The class was technique rich and I'm pleased to say that I'm no longer afraid of doing an image transfer onto wood and can finally create convincing rust!!! The only thing that didn't go to plan on this project was the cracking, which I suspect was more to do with me than the product ;D However, I have to say the lack of cracking has led to a "happy accident" - I added more of the cracking solution and did indeed get more ultra fine cracks, but if you look closely it also created a rather fantastic pitting effect!

Thanks for stopping by.

Claire x

I'd like to enter this project into the following challenges:
Simon Says Stamp & Show - Rustification (sorry guys you must be sick of seeing these by now!)

Friday 12 October 2012

Vintage Christmas Tag

It's my turn to post over at the Studio 12 blog today. This was a really quick and easy tag using up all of my left over scraps and a photograph/scan of my mixed media wall hanging. What do you think?


The colours on the photograph have been manipulated in my photo editing software. I've then sized the image to my required size before running it through my printer and cutting with a Sizzix Tag Die. The masking tape was left over from a snowflake card which you no doubt spotted on the launch show, but I have yet to show you, and the seam binding and embroidery thread were in my stash. Before I go I just want to show you a different view of the tag in particular the baubles, as I've used a Sakura Glitter pen for sparkle and a Sakura Glaze Pen for shine and dimension (have to say it is one of my most favourite gizmos at the moment!).


Thanks for stopping by today.

Claire x

I'd like to enter this tag into the following challenges:

Wednesday 10 October 2012

Shhh - There's Fairies In My Garden!!!

Yep it's true and I have the photographic evidence!!! :D

This weeks challenge over at Stampotique is to use your stamps in conjunction with a photograph. Now as many of you know I quite enjoy scrapping but don't find it the most natural thing in the world to do. So when I saw this challenge it was kind of a "gulp moment" and then a "ohhhhh what am I gonna do one." Then when cleaning the loo inspiration stuck...... I spotted a favourite photo of my two little cherubs that had been stuck in a frame and hung on the wall in there (lol, just thought that this is maybe TMI??). I really hope you'll join us  this time, remember you don't need to use a Stampotique image to enter!


I also had this picture from Dunelm Mill that I picked up for the princely sum of £0.49p (well I picked up a couple actually but we won't go there!!) which I needed to prove wasn't a "white elephant". So I thought instead of a scrap LO I'd try a photo canvas of sorts!

Now this photo was taken years ago before everyone had a digital camera and I only had a cheapy point & shoot one, so it hadn't been enhanced and worse still I couldn't find the negatives. So I almost knocked the idea I had on the head. Hubby suggested scanning the photo - epic fail - it was really grainy and no matter what I did it wouldn't go right! Then my lovely daughter suggested taking a photo of it! Of course genius, why didn't I think of it! So that's what I did. Now it's not perfect, but it's certainly passable and tbh as this piece is for me and it's more about the memory than artistic perfection, I thought I'd run with it. So this is what I came up with.....


I started of by applying a generous coat of Gesso to the picture. Once dried I blended Distress Inks to create a background. Now the DI's didn't behave exactly as I'd expected, as they dried they faded and kind of ran together to create different hues, but I still liked the effect so I left it. Next I stamped, coloured and cut out Giant Shroom, Mushroom Group and Stones & Grass Cube and glued them into position. The mushrooms have had Glossy Accents added to the red areas and the wings on my daughter's costume have had been liberally covered with Stickles. To finish I stamped the "there are fairies in my garden" sentiment onto tissue paper and glued it into position.

Thanks for stopping by today.

Claire x

I'd like to enter this project into the following challenges:
Make It Monday - Anything Goes
Inspire Me Fridays - Anything Goes
Craft Room Challenge - Alter It
Top Tip Tuesday - Things With Wings
Joanne Sheen - Down In The Garden
Craftymess Challenge - Anything Goes
Related Posts Plugin for WordPress, Blogger...